Wednesday, 16 June 2010

how i animated my character

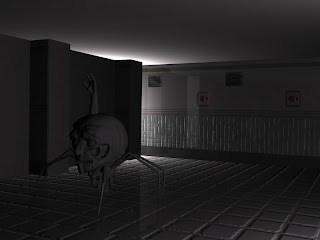
Due to the fact that the only standard bipeds that you can get on 3ds Max are all human shape for my none human shaped creature i had to make my own. The only part of my character that i needed to move for my cut scenes were the legs. The legs were all separate objects and weren't connected to each other or the head. Then i started making my own bones for each of the legs.
The first thing that i had to do to make the bones was click on the animation drop down box and click on the bones tools... option. After i did this i had to click on the bone create button on the bones tool menu. after that i drew the three section of the leg with the bone tool and put the end result into the leg. When you draw a set of bones you can keep drawing them until you right click but when you do right click it will create a little square bone at the end that you just right clicked off. After i had drawn out the leg i clicked on the Animation drop down bar again but this time clicked on IK Solver and from that clicked on HI solver. With HI solver selected i clicked on the last square created with the right click and then the middle leg section. i then clicked on the connecting point between the second and third leg section and the leg section connecting the leg to the head. The reason that i did this is so that they would give me an easy moving point and because it i moved one limb it would move the limb that it is connected to through the HI solver giving it a more realistic effect. I repeated this on all six of the legs then i was ready for the animation first i did a quick test to see if the leg connectors worked properly which you can see below.
Then i did some research on spiders and how they moved before trying to properly animate the legs.

After i did this all i had to do was import merge my environment with this and move the characters to a different position so it looked like the character was actualy moving.

Triangle Polygon

In 3ds Max a flat object with at least three sides and a surface area is a polygon. To create a triangle polygon the first thing you have to do is create a vertex and then a line leading to another vertex then a line from that vertex to a third vertex and a final line back to the original vertex. Polygons are the building blocks of 3ds Max, every model is made up of lots of polygons.

Monday, 26 April 2010

Creating my 3D Environment in 3ds Max


The 3D environment for my cut scene is a relatively simple one, I was originally going to use a tutorial but couldn't find any good ones. I found a tutorial that was brief and uninformative but it had a good texture that i could use for my environment.


The first thing that i did towards creating my environment was create a normal box and then flip the normals to invert it. The reason for flipping the normals is so that the textures appear on the inside rather than the outside. I then separated each of the sides and extruded segments from the walls to create the columns.


Then I just had to texture it. I got the textures of the tutorial and took them into Adobe Photoshop and edited them till i got the texture that i wanted. Then while they where still in Photoshop i made back and white copies of them for bump mapping. I had to make some sections darker and some lighter though to get the effect that i wanted.


I then took them into 3ds max and created the textures that i wanted by first putting the texture in the Diffuse Colour section then putting the black and white version in the bump mapping section at Amount 30. Finally to give the texture its desired effect I equipped Flat Mirror to the filter colour to give it a reflection, Amount 7.


But when it came to applying my textures to the box they stretched all the way round instead of just staying on the area i had selected. So i searched for a tutorial that could fix this problem. In the end i didn't find any useful tutorials so i created plains the same size as my textures and stacked them up against the walls and the pillars and used the texture on them.

Wednesday, 10 February 2010

Explanation on how i made my 3D chess set in 3ds max

I created this chess set with a combination of a tutorial that I found on the Internet and using my own knowledge. The tutorials web address is http://images.autodesk.com/adsk/files/3dsmax_2010_moddeling.pdf


The tutorial only teaches you to create the Knight, pawn, bishop and castle, i had to create the king, queen and chess board myself.


The first part that i worked on was the pawn chess piece. This one was the first that the tutorial started with most likely because it was the easiest. The first thing that i did was get the same picture of chess pieces as the tutorial.


I then clicked on the front view panel and enlarged it (Alt W). In this viewpoint I zoom in to the pawn because this is the first chess piece that i am going to work on. I started making it by using the line tool and drawing it down the middle of the pawn then using the same line i do an outline of the pawns right side, I continue to do this line until it meets at the top again. After this I go to the creation method roll out and set both initial type and drag type to corner. Then activate the Fillet button from the geometry roll out, then with vertex selected you can smooth off the jagged edges left from the line. I now had the basic outline of the shape and could spline it which coppies the outline that i did 360 degrees round the line in the middle of the pawn creating a 3D pawn.
The next peice that i made was the castle, the first half of the castle is made in the same way as the pawn was done, first by drawing a line down the middle and around the right side then splineing. After this the castle is nearly finished, all i have to do after this is select all of the polygons on top of the castle and inset them to turn each polygon into two polygons.


After I had inset the castle I had to decide how to space them out. I decided to select 4, skip 2, select 4, skip 2, etc. until I had all the polygons that I needed selected. I then extruded the polygons to a length that looked consistent with the reference picture.
Next was the Bishop which was again made with the line and spline tools. The only different thing that I had to do for the bishop was to make that gap that they have on one side of them. The way that I did this was by creating a rectangle the right size for the gap and extruding it into the bishop. After that I went to the compound menu and selected Boolean which cut the shape of the rectangle into the bishop.
The knight was the last chess piece that was explained in the tutorial and is also the hardest one of the pieces to make. To start off I used the line tool but this time drew all the way around the reference image for the knight. Then I went to the creation method rollout in the creation panel and smoothed all the corners to fit the reference image better. I then used refine/connect to create more lines going down and across the knight to help shape the knights body this is called a spline cage. I then went into the top view and moved the cage till it matched the image given in the tutorial. This is what makes the horse 3D. The line that I originally drew around the reference image has symmetry on so the image becomes 3D.
When I originally did this the knight it did not look like it should the curves and shape of the body were not correct, so I had to start again from scratch because I wasn’t sure at what stage the knight had gone wrong. I got it right on the second attempt and that was as far as the tutorial took me.
The next piece that I worked on was the queen, since this piece was not covered in the tutorial I had to use the knowledge that I obtained from doing the tutorial to make this piece. The first thing that I did was use the technique taught on the pawn by drawing a line down the middle but leaving out the cross at the top. This gave me the base for the queen after that I drew out the shape of the cross with the line tool and turned it into an editable poly; I then extruded it to the right thickness. After that I attached the cross to the base and the queen was finished. The last piece was the king. I made the king exactly the same way as the pawn.
After all the pieces were done all that was left was to make a cube to serve as the chess board and texture it all black and white.

Monday, 23 November 2009

An explanation on how i made my practice 3D landscape

This tutorial was a lot shorter than the previouse one that i did, it was also alot simpeler and quicker. It is an cartoon enviroment with grassy hills, tree's and a road.
I started off by making the lanscape. The way that i do this is by going to the control panel and clicking on create>geometry. Then from the drop down box i had to select Patch grids. I then maximised the top veiwpoint and created a flat plane with a length and width of 200 and 4 length and width segments.
I then right clicked on the plane and converted it to an editable patch, the reson that i converted the plane is that this makes it possible to edit the shape of the plane so i can make it bumpy for the hills.

The hills are now finished the next thing that i had to do was create a road to go around my hills. i start of the road by drawing the outline with the line tool. I then had to select compound objects from the drop down menu. i then clicked the loft button, get shape and rectangle. Then i just had to fit the road to the shape of the hills, the way i did this was by opening the Skin Parameters rollout and activationg Optimize Shapes. I then hadd to change the road to an Editable Poly nd activate Polygon selection. I thenn had to select all the side and bottom polygons and deletede them. I will then use the wrapper, when the road is selected click conform and then click the landscape. This will leave collours mixed and some parts of the road sticking in the air, the way to fix this is by activating Hide Wrap-To Object.

The trees were made very simply aswell, the leaves of the trees were green spheres and the trunks were just brown cylinders. I just made one and then copyed it enough to fill the landscape i also changed the sizes to add variety.